Metadata Leakage in CV Files (PDF/DOCX) and De-identification Methods
How resume files expose your real name, OS, GPS coordinates, company structure, and internal GUIDs. A complete guide to sanitizing metadata before submission.
Sarah Jenkins, CISA
Lead Information Security Auditor & OSINT Specialist
Sarah Jenkins is a certified information security auditor and threat intelligence investigator. With over a decade of auditing experience, she publishes deep technical guides on smart contract vulnerabilities, IAM misconfigurations, metadata leaks, and supply chain threats.
When you apply for a job, your resume travels a long road: through ATS (Applicant Tracking Systems), recruiter inboxes, internal Slack or Telegram chats, and finally onto hiring managers’ local drives. Most candidates meticulously refine every single word in their CV text but completely forget about the hidden layer of data — metadata.
PDF and DOCX files created in popular editors (Microsoft Word, Google Docs, Adobe Acrobat, macOS Pages) contain a vast array of hidden service information. For a security researcher or a potential attacker, this metadata is a gold mine. It can reveal your real name, the operating system you use, your office suite version, document edit history (including deleted sensitive text), exact working hours, and even your physical geolocation.
In this article, we will thoroughly analyze the internal structure of document metadata, show how to extract this information, and provide ready-made tools for automatic de-identification of resume files.
1. Anatomy of Metadata: PDF vs. DOCX
How metadata is stored depends on the file format. Let’s look at the two most popular resume formats.
PDF (Portable Document Format)
In PDF format, metadata is typically stored in two places:
- Document Information Dictionary (Info Dict): The traditional method containing standard fields such as
Title,Author,Subject,Keywords,Creator(the creation tool),Producer(the PDF conversion tool), and creation/modification dates. - XMP Metadata Streams (Extensible Metadata Platform): An XML-based standard developed by Adobe. It duplicates the Info Dict but can store much more detailed information, including modification history (revisions), unique document identifiers (DocumentID, InstanceID), and even color profile settings.
Let’s look at an example of an XMP stream structure inside a PDF:
<x:xmpmeta xmlns:x="adobe:ns:meta/">
 <rdf:RDF xmlns:rdf="http://www.w3.org/1999/02/22-rdf-syntax-ns#">
  <rdf:Description rdf:about=""
    xmlns:pdf="http://ns.adobe.com/pdf/1.3/"
    xmlns:xmp="http://ns.adobe.com/xap/1.0/"
    xmlns:dc="http://purl.org/dc/elements/1.1/">
   <pdf:Producer>Mac OS X 10.15.7 Quartz PDFContext</pdf:Producer>
   <xmp:CreatorTool>Pages</xmp:CreatorTool>
   <xmp:CreateDate>2026-05-12T14:23:11+03:00</xmp:CreateDate>
   <xmp:ModifyDate>2026-07-21T10:15:30+03:00</xmp:ModifyDate>
   <dc:creator>
    <rdf:Seq>
     <rdf:li>Dmitriy S.</rdf:li>
    </rdf:Seq>
   </dc:creator>
  </rdf:Description>
 </rdf:RDF>
</x:xmpmeta>
DOCX (Office Open XML)
The DOCX format is essentially a standard ZIP archive containing a set of XML files and assets. If you unzip a DOCX file, you will find the metadata inside the docProps folder in the following files:
core.xml: Contains basic properties (creator, creation date, modification date, number of revisions).app.xml: Contains application properties (text editor name, version, total editing time, word/page counts, and hidden elements).custom.xml: Custom properties that might be injected by corporate templates.
Example content of docProps/core.xml:
<?xml version="1.0" encoding="UTF-8" standalone="yes"?>
<cp:coreProperties xmlns:cp="http://schemas.openxmlformats.org/package/2006/metadata/core-properties"
                   xmlns:dc="http://purl.org/dc/elements/1.1/"
                   xmlns:dcterms="http://purl.org/dc/terms/"
                   xmlns:xsi="http://www.w3.org/2001/XMLSchema-instance">
  <dc:creator>John Doe</dc:creator>
  <cp:lastModifiedBy>Domain Administrator</cp:lastModifiedBy>
  <cp:revision>14</cp:revision>
  <dcterms:created xsi:type="dcterms:W3CDTF">2026-04-10T12:00:00Z</dcterms:created>
  <dcterms:modified xsi:type="dcterms:W3CDTF">2026-07-20T18:45:00Z</dcterms:modified>
</cp:coreProperties>
2. What Threats Does Metadata Leakage Pose?
Metadata leakage might seem like a trivial issue at first glance. In practice, however, it introduces severe risks:
- De-anonymization during confidential job searches: If you are looking for a job secretly (while still employed at your current company), your resume’s metadata might contain your real name, corporate login, or current company name, even if you removed them from the visible text of your CV.
- Infrastructure and software stack exposure: The
ProducerorCreatorToolfield shows which software you use (e.g., a specific old version of MS Word vulnerable to certain CVEs). This makes it much easier for attackers to launch highly targeted spear phishing campaigns. - Recovery of deleted information: In some cases, PDF files store incremental changes. If you simply deleted old jobs or contact details from your resume and saved the file, that data might physically remain in previous versions (Incremental Updates) inside the PDF container.
- Geolocation privacy violations: If you insert a photo taken directly on your phone into your resume, and the image was not compressed and cleaned during PDF conversion, the image’s EXIF data might contain the exact GPS coordinates of where the photo was taken (e.g., your apartment).
3. Hands-on Metadata Analysis: Using ExifTool
The most powerful command-line utility for reading and writing metadata is Phil Harvey’s ExifTool.
To analyze your resume, run the following command in your terminal:
exiftool -a -u -g1 cv_draft.pdfThe flags mean:
-a: show duplicate tags;-u: show unknown tags;-g1: group output by metadata family.
Example of typical output for an unsafe resume:
---- System ----
File Name                       : cv_draft.pdf
Directory                       : .
File Size                       : 124 KiB
---- File ----
File Type                       : PDF
File Type Extension             : pdf
MIME Type                       : application/pdf
---- PDF ----
PDF Version                     : 1.6
Linearized                      : No
Page Count                      : 2
Title                           : CV_Senior_SRE_2026
Creator                         : Microsoft® Word for Office 365
Producer                        : macOS Version 14.5 (Build 23F79) Quartz PDFContext
Create Date                     : 2026:05:12 14:23:11+03:00
Modify Date                     : 2026:07-21 10:15:30+03:00
Author                          : Dmitriy Second
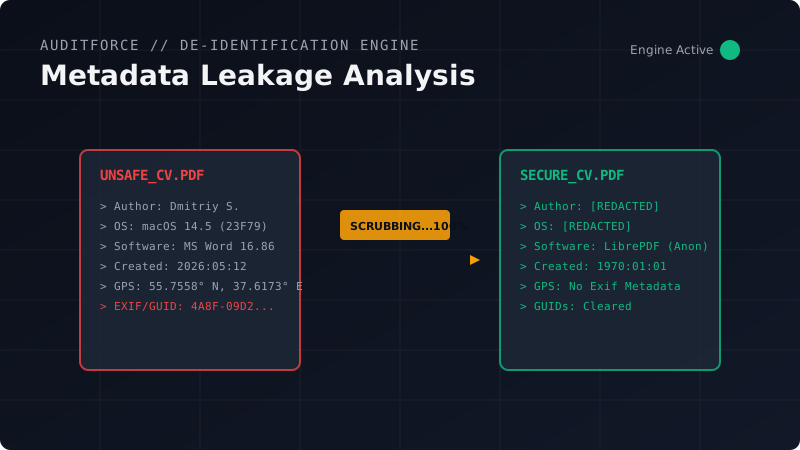
Notice that we can clearly see the author’s name (Dmitriy Second), the operating system (macOS Version 14.5), the document creation environment (Microsoft® Word for Office 365), and the exact timestamps of when the file was worked on.
4. Automatic Metadata Sanitization Script in Python
To automate the sanitization process on our platform, we use specialized libraries. Below is a complete Python script that fully strips all metadata from a PDF file, overwrites XMP streams, and resets creation dates to the Unix epoch (1970-01-01).
To run this script, you will need the pypdf and pikepdf libraries. Install them via:
pip install pypdf pikepdfThe script sanitize_cv.py:
#!/usr/bin/env python3
import sys
import os
import pikepdf
from pypdf import PdfReader, PdfWriter

def sanitize_pdf_pypdf(input_path, output_path):
    """
    Basic PDF container sanitization and removal of the metadata dictionary.
    """
    reader = PdfReader(input_path)
    writer = PdfWriter()

    for page in reader.pages:
        writer.add_page(page)

    # Write an empty metadata dictionary
    writer.add_metadata({})

    with open(output_path, "wb") as f:
        writer.write(f)

def deep_sanitize_pikepdf(input_path, output_path):
    """
    Deep sanitization using pikepdf:
    removes XMP streams, alternate views, and rebuilds objects.
    """
    with pikepdf.open(input_path) as pdf:
        # Remove embedded metadata (XMP)
        try:
            del pdf.Root.Metadata
        except AttributeError:
            pass

        # Clear the classic Info Dictionary
        try:
            info = pdf.docinfo
            for key in list(info.keys()):
                del info[key]
        except AttributeError:
            pass

        # Add standard anonymous values to prevent parser errors
        pdf.docinfo['/Producer'] = 'LibrePDF (Anonymous Engine)'
        pdf.docinfo['/Creator'] = 'Anonymous Document Generator'
        pdf.docinfo['/CreationDate'] = 'D:19700101000000Z'
        pdf.docinfo['/ModDate'] = 'D:19700101000000Z'

        # Save with full object optimization
        pdf.save(output_path, linearize=True)

def main():
    if len(sys.argv) < 3:
        print("Usage: python sanitize_cv.py <input.pdf> <output.pdf>")
        sys.exit(1)

    input_file = sys.argv[1]
    output_file = sys.argv[2]

    if not os.path.exists(input_file):
        print(f"Error: File {input_file} not found.")
        sys.exit(1)

    temp_file = "temp_clean.pdf"
    try:
        print("[*] Step 1: Performing basic container cleanup...")
        sanitize_pdf_pypdf(input_file, temp_file)

        print("[*] Step 2: Deep sanitizing XMP and optimizing objects...")
        deep_sanitize_pikepdf(temp_file, output_file)

        if os.path.exists(temp_file):
            os.remove(temp_file)

        print("[+] Sanitization completed successfully! Saved to:", output_file)
    except Exception as e:
        print(f"[-] An error occurred during sanitization: {e}")
        if os.path.exists(temp_file):
            os.remove(temp_file)
        sys.exit(1)

if __name__ == "__main__":
    main()
How It Works:
- pypdf parses the document page-by-page and rebuilds it into a fresh container. This physically cuts off any incremental updates and edit history that might have been hidden in the original PDF.
- pikepdf (built on top of the powerful C++ library QPDF) interacts directly with the PDF object tree. It completely deletes the XML schema
Root.Metadata, empties the/Infodictionary, and replaces sensitive fields with anonymous values dated1970-01-01 00:00:00 UTC.
5. Alternative Method: Using System Utilities in Linux
If you are running Linux/macOS and prefer command-line tools without Python, you can use PDFtk or ExifTool:
Sanitizing metadata via ExifTool:
exiftool -all= -overwrite_original cv.pdfNote: This command removes all standard tags, but depending on the PDF version, XMP data might not be completely removed.
For guaranteed results, it is better to force-overwrite XMP:
exiftool -all= -tagsFromFile @ -all:all -unsafe -XMP:All= cv.pdf6. Summary: Security Checklist Before Submitting
To ensure your resume does not expose any unintended data, follow these rules when preparing your final file:
- Avoid direct saving from Word/Pages without verification. Always run the final PDF through a sanitization script.
- Compress and sanitize images. If you insert your photo into your resume, clean its EXIF data (especially geo-tags) beforehand.
- Verify the final file using
exiftool. This should be a mandatory step before sending your CV to any recruiter. - Use neutral filenames. A filename like
Dmitriy_S_Resume_SRE.pdfis much safer and more professional thanCV_SRE_draft_v12_edit_Dima_macbook_final.pdf.
Information hygiene starts with small steps. Protect your personal data before it ends up in someone else’s database.
Read more job search privacy & security guides on the AuditForce blog.
Related Posts
Using OSINT to Verify Recruiters and Detect Job Phishing
A practical guide to conducting background investigations (OSINT) on employers, checking domains, analyzing email metadata, and identifying targeted phishing campaigns.
Understanding Password Strength and Crack Time Estimates
Why traditional passwords fail, how entropy is calculated, and what makes a truly secure password in the modern age.
On this page
Category
privacy-guidesRelated Posts
Using OSINT to Verify Recruiters and Detect Job Phishing
A practical guide to conducting background investigations (OSINT) on employers, checking domains, analyzing email metadata, and identifying targeted phishing campaigns.
Understanding Password Strength and Crack Time Estimates
Why traditional passwords fail, how entropy is calculated, and what makes a truly secure password in the modern age.